To edit debtor details:
Refer to "Adding a New Debtor" or "Updating a Debtor".
|
|
Field |
Value |
|---|---|---|
|
|
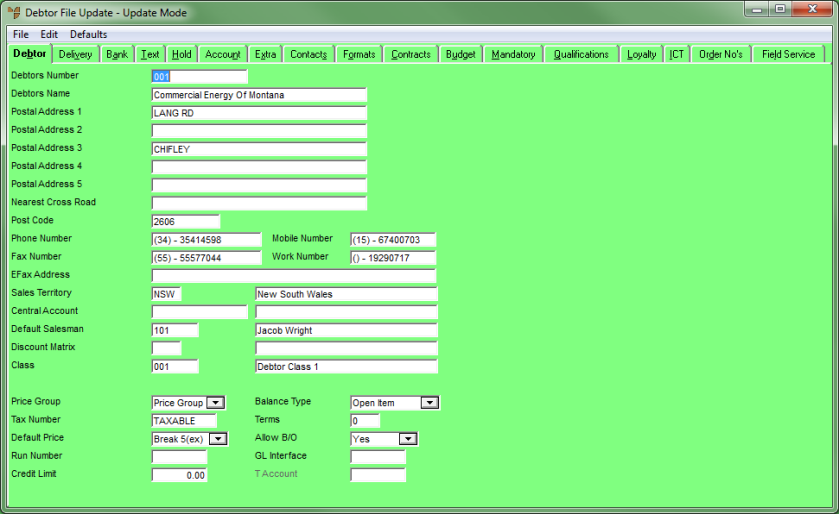
Debtors Number |
Micronet displays the debtor number for existing debtors. If you are creating a new debtor and Micronet has been set up to generate automatic debtor numbers, this field displays AUTO and the next available debtor number displays in the Next Number field. Select the Take Next button to take the next number for this debtor. (Automatic debtor numbers are set in the Automatic Debtor Numbers field on the Debtors Configuration screen – see "Edit - Program - Debtors".) If Micronet is not set up for automatic debtor numbers, enter a unique number for the new debtor based on your company's debtor numbering conventions. Make sure there are no trailing spaces in the debtor number. |
|
|

|
Reference To change a debtor's number, see "Maintenance - Other Maintenance - Change Debtors". |
|
|
Debtors Name |
Micronet displays the debtor's name for existing debtors. For new debtors, enter the debtor's name. This name is printed on invoices, picking slips and other relevant documents. Additional unlimited text can also be entered against a debtor on the Debtor File Update screen - Text tab – see "File - Debtor - Text". |
|
|
|
Technical Tip There is a handy feature you can use when you want users to replace the current debtor with a different one. If you type the word "Use" at the start of the debtor name followed by another debtor number, Micronet will replace the current debtor with the second one whenever a user enters the current debtor number. For example, if you change a debtor name from "ABC" to "Use DEF", whenever a user enters ABC when searching for a debtor, Micronet will replace it with debtor DEF. |
|
|
Postal Address 1, 2, 3, 4, 5 |
Enter up to five lines of address details for the debtor, e.g. unit number, street address, suburb and state. Note that you can store multiple delivery addresses, phone/contact details and default freight costs against each debtor account using the Debtor File Update screen - Delivery tab – see "File - Debtor - Delivery". |
|
|
Nearest Cross Road |
Enter the nearest cross road for the debtor’s address. |
|
|
Post Code |
Enter the debtor’s postcode. |
|
|
Phone Number |
Enter the customer’s phone number. |
|
|
Fax Number |
Enter the customer’s fax number. |
|
|
EFax Address |
2.8 Feature If your company has a UTBox account, and this debtor wants to receive their invoices, statements and reports by fax, enter the debtor’s fax number. You must add "@fax.utbox.net" after the fax number, e.g. 61295422100@fax.utbox.net. For information on setting up a UTBox account, contact your Micronet account manager. |
|
|
Mobile Number |
Enter the customer’s mobile number. |
|
|
Work Number |
Enter the customer’s work number. |
|
|
Contact |
Enter the name of the customer’s main contact. |
|
|
Sales Territory |
Enter the customer's default sales territory if required, or press Tab or Enter to select a sales territory. This allows grouping of customers into sales territories or regions for reporting and analysis. |
|
|
Central Account |
If this debtor has a central account, enter the central debtor. This might apply, for example, to a local debtor with a central head office. The central account is the account to which invoices are sent. A central account must exist as a normal debtor’s account before it can be used. If you set or change the central account on a debtor and transactions already exist for the debtor, you will be prompted to update those transactions. Selecting Yes to the prompt updates posted transactions like invoices and payments. It also updates unposted transactions including picking slips, paperless slips, quotes and held invoices. |
|
|
Default Salesperson |
Enter the number of the default salesperson for this customer. You can also press spacebar then Enter to select a salesperson. Micronet displays the salesperson’s name. 2.8 Feature If the salesperson you want does not appear in the list of salespeople, it is probably because they have been made inactive – see "File - Salesperson - Sales Person". |
|
|
Discount Matrix |
Enter the default discount matrix for this debtor. You can also press spacebar then Enter to select a discount matrix. |
|
|
Class |
Enter the default class for this debtor. You can also press spacebar then Enter to select a class. This field gives you an alternative means of grouping customers for reporting/inquiries. |
|
|
Price Group |
Select the default price group for this customer:
Pricing is retrieved during invoicing from the Inventory master file based on this price group. The prices for these price groups are setup on the Item Update screen - Sell Price tab – see "File - Inventory - Sell Price". |
|
|
Tax Number |
Micronet displays TAXABLE in this field. This applies to all customers liable to pay GST or sales tax. The following exceptions apply:
Any entry in the tax number field other than TAXABLE is treated as GST exempt. |
|
|

|
Technical Tip If the Tax Number field is set to EXPORT, the sales dissection in the GL Interface automatically overrides and sets a BAS flag of Sales to Exports (G2). Separate GL integration is not necessary for export sales. |
|
|
Default Price |
Select the default sell price break for this customer. Micronet displays this default as the sell price during invoicing. |
|
|
Run Number |
If you have set up standing orders for this debtor, enter the default customer run number. For more information on standing orders, see "Sales - Standing Orders". |
|
|
Credit Limit |
Enter the customer’s credit limit. If this debtor is a central account, the credit limit you enter here applies to all "child" accounts. For example, if you enter a credit limit of $10,000 on the central account and one child account spends $8000 and another spends $2000, the credit limit will be reached. Any credit limit you enter on the "child" accounts will be ignored. |
|
|
Balance Type |
Select the customer’s balance type. Options are:
|
|
|
Terms |
Enter the number of days by which invoices must be paid. |
|
|
Allow B/O |
Select Yes if backorders are allowed for this customer, or No if they are not. |
|
|
GL Interface |
If you want to dissect sales/stock/debtors by customer, enter the name of the GL interface record for this customer. For more information on setting up GL interface records for the General Ledger, see "Setting up Micronet Integration". |
|
|
T Account |
If you are using T accounts within MGL, assign the default details for this customer. |
Refer to "Debtor File Update Screen - Menu Options".